
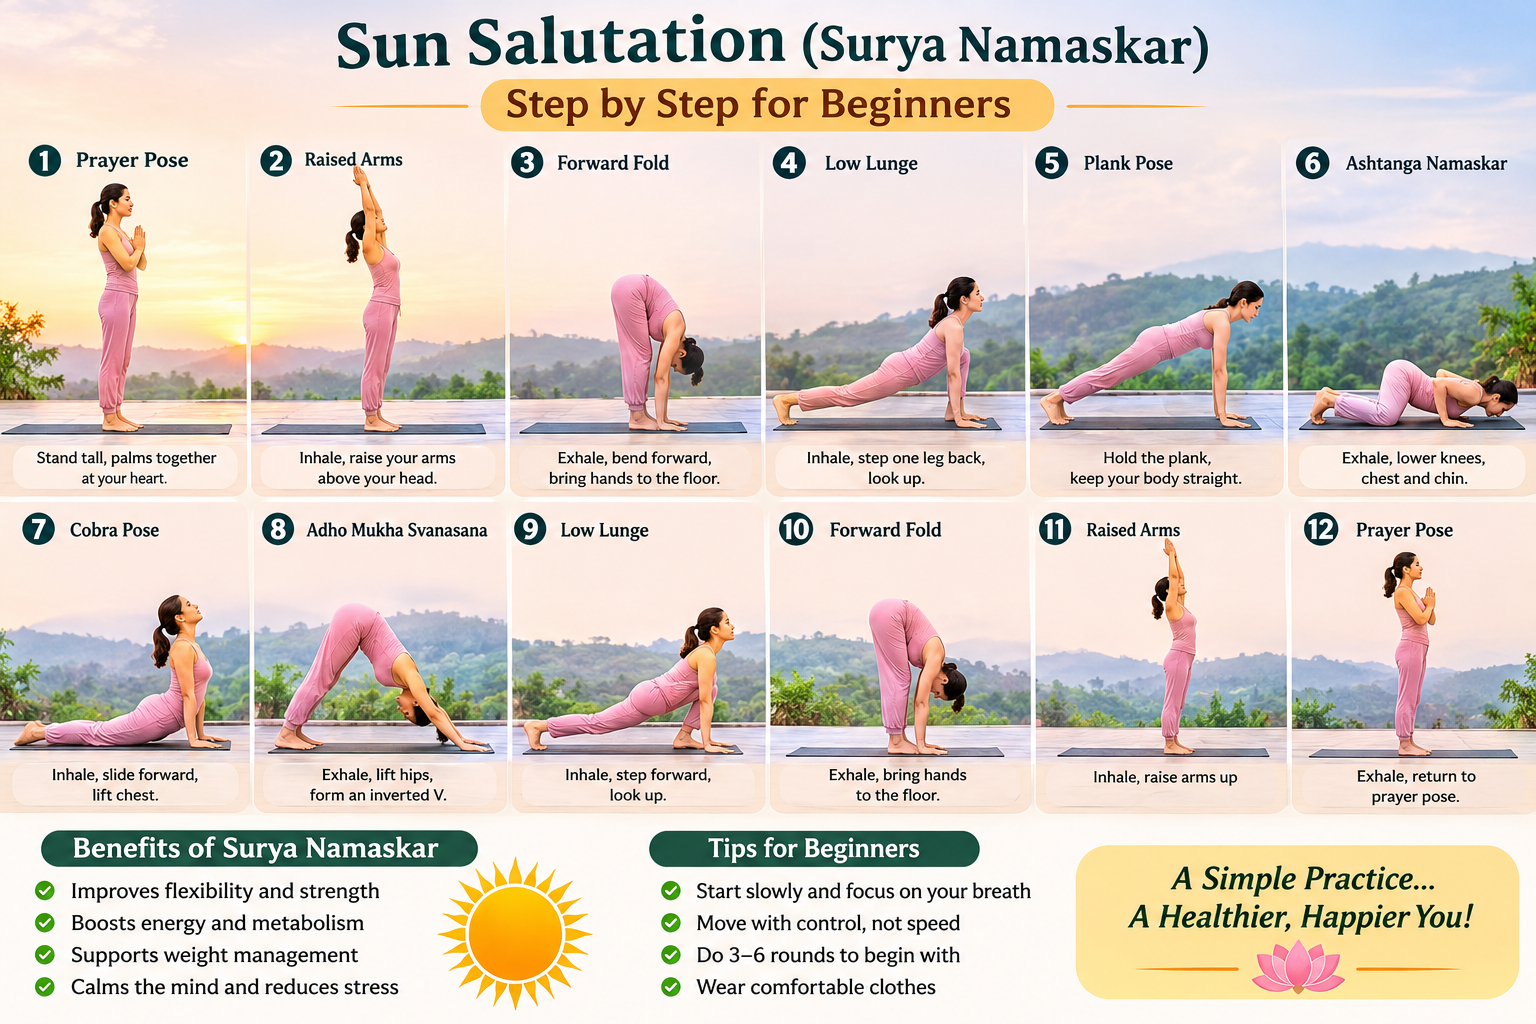
If you’ve ever walked into a yoga class and watched people flow through a graceful sequence of bends, lunges and stretches, you’ve probably seen Surya Namaskar. The Sun Salutation is one of the most recognised yoga sequences in the world. It’s also one of the most beginner-friendly. In one continuous flow, it moves your spine, opens your hips and shoulders, and connects your breath to your movement.
This guide explains the Sun Salutation step by step: the 12 poses, the breathing for each, the benefits, the common mistakes and the safety precautions. It’s written for complete beginners, whether you’re practising at home or preparing for a more serious yoga journey.
What Is Surya Namaskar?
Surya means “sun” and namaskar means “salutation” or “bow.” Surya Namaskar is a sequence of 12 linked postures that is traditionally practised facing the rising sun as an expression of gratitude for light, life and energy.
Sun worship is ancient in Indian culture, but the 12-pose flowing sequence taught in most classes today took its modern form in the early 20th century. Teachers such as Krishnamacharya and the Rajah of Aundh, Bhawanrao Pant Pratinidhi, helped popularise it. Today you’ll find versions across Hatha, Vinyasa and Ashtanga traditions, with small variations in the poses and the order.
Each full round has two halves. The first half takes the right leg back in the lunge and the second takes the left leg back. Completing both halves counts as one full round.
Benefits of Surya Namaskar
Regular practice can offer benefits for body and mind, though results vary from person to person.
- Flexibility and mobility: The sequence stretches the hamstrings, hips, spine, shoulders and chest.
- Strength and stamina: Holding the plank, pushing up into the cobra and moving through lunges build strength in the arms, core and legs.
- Cardiovascular activity: Done at a steady pace, several rounds raise the heart rate gently.
- Better breathing awareness: Matching inhalations and exhalations to movement trains slow, controlled breathing.
- Stress relief: The rhythmic flow and breath focus can calm the nervous system. Many people find this carries into everyday life, and it connects to the wider topic of yoga for mental health.
- Posture: Alternating forward bends and backbends keeps the spine mobile and can ease stiffness from desk work.
Small studies have linked Sun Salutation practice with improvements in flexibility, balance and perceived stress. Surya Namaskar is not a substitute for medical treatment, though.
Before You Begin: Preparation Tips
A little preparation makes the practice safer and more enjoyable.
- Choose the right time. Early morning, ideally at sunrise, is traditional. Evening works too if you’re warmed up.
- Practise on an empty stomach. Wait 3 to 4 hours after a heavy meal, or about 1 to 2 hours after a light snack.
- Use a non-slip mat on a flat surface, with enough room to stretch your arms and legs fully.
- Wear comfortable clothing that lets you bend and breathe freely.
- Warm up briefly. A few neck rolls, shoulder circles and gentle side stretches go a long way.
- Breathe through your nose throughout the sequence, unless your teacher suggests otherwise.
Surya Namaskar Step by Step: The 12 Poses
Move slowly at first. Speed comes with practice and isn’t the goal.
Step 1: Pranamasana (Prayer Pose)
Breath: Exhale
Stand at the front of your mat with your feet together or hip-width apart. Bring your palms together at the centre of your chest, relax your shoulders and distribute your weight evenly across both feet. Close your eyes briefly and settle your breath.
Step 2: Hasta Uttanasana (Raised Arms Pose)
Breath: Inhale
Lift your arms overhead and slightly back, keeping them shoulder-width apart. Lengthen your spine and gently arch back from the upper body. Keep your neck comfortable and your lower back from collapsing by drawing your belly in lightly.
Step 3: Hasta Padasana (Standing Forward Bend)
Breath: Exhale
Hinge forward from your hips, not your waist, and bring your hands beside your feet or onto your shins. Beginners should bend the knees freely. Let your head hang heavy and release your neck.
Step 4: Ashwa Sanchalanasana (Equestrian Pose)
Breath: Inhale
Place your palms flat on the floor and step your right leg back, lowering the right knee if needed. Lift your chest, look slightly forward and keep your left knee above your left ankle. This opens the hip flexors.
Step 5: Parvatasana or Plank Pose (Mountain/Plank)
Breath: Hold the breath briefly or exhale
Step your left foot back to meet the right and form a straight line from head to heels. Press your palms firmly into the mat, engage your core and keep your hips from sagging or lifting. Many beginners lower their knees here, which is perfectly fine.
Step 6: Ashtanga Namaskara (Eight-Limbed Salutation)
Breath: Exhale (or hold out)
Lower your knees, chest and chin to the mat, keeping your hips slightly raised. Eight points touch the floor: two feet, two knees, two hands, chest and chin. Beginners can gently lower the whole body if this feels too intense.
Step 7: Bhujangasana (Cobra Pose)
Breath: Inhale
Slide forward and lift your chest, keeping your elbows slightly bent and close to your body. Press the tops of your feet down, draw your shoulders away from your ears and look forward or slightly up. Avoid pushing into your lower back. Use your back muscles to lift, not just your arms.
Step 8: Parvatasana (Mountain Pose / Downward-Facing Dog)
Breath: Exhale
Tuck your toes, lift your hips up and back, and form an inverted “V.” Press your hands into the mat, lengthen your spine and keep your knees soft if your hamstrings are tight. Let your head hang between your arms.
Step 9: Ashwa Sanchalanasana (Equestrian Pose, Second Side)
Breath: Inhale
Step your right foot forward between your hands and lower your left knee if needed. Lift your chest and gaze slightly forward. This mirrors Step 4, but with the opposite leg back, completing the balance of the sequence.
Step 10: Hasta Padasana (Standing Forward Bend)
Breath: Exhale
Bring your left foot forward to meet the right and fold forward. Keep your knees bent as much as needed and relax your head and neck.
Step 11: Hasta Uttanasana (Raised Arms Pose)
Breath: Inhale
Sweep your arms out and up as you rise slowly, lengthening your spine. Stretch overhead and arch slightly back, as in Step 2.
Step 12: Pranamasana (Prayer Pose)
Breath: Exhale
Return to the starting position with palms together at your chest. Pause for a breath or two and notice how your body feels. You’ve completed half a round. Repeat the sequence with the left leg stepping back first to finish a full round.
Quick Breathing Summary
| Movement | Breath |
|---|---|
| Prayer pose | Exhale |
| Raised arms | Inhale |
| Forward bend | Exhale |
| Lunge | Inhale |
| Plank | Hold/Exhale |
| Eight-limbed | Exhale |
| Cobra | Inhale |
| Mountain/Down Dog | Exhale |
| Lunge (other side) | Inhale |
| Forward bend | Exhale |
| Raised arms | Inhale |
| Prayer pose | Exhale |
How Many Rounds Should a Beginner Do?
Start with 2 to 3 full rounds and slowly build up over a few weeks to 6 to 12. A steady pace beats a rushed one. If you feel dizzy, breathless or strained, stop and rest in a comfortable pose such as child’s pose. Consistency matters far more than quantity.
Common Mistakes Beginners Make
- Rushing through the poses. Slowing down improves alignment and breath control.
- Forgetting to breathe. Holding your breath tightens the body and tires you faster.
- Locking the knees in forward bends. Keep them soft.
- Collapsing the lower back in plank or cobra. Engage your core and lift through the chest.
- Overarching the neck in backbends. Keep the neck long and in line with the spine.
- Comparing yourself with others. Every body moves differently.
Safety Precautions and Who Should Be Careful
Surya Namaskar is generally gentle, but it isn’t suitable for everyone without guidance. Check with a doctor or qualified yoga teacher first if you:
- Are pregnant (poses and intensity need adjusting)
- Have high blood pressure or heart conditions
- Have a hernia, back or neck injury, or wrist problems
- Have recently had surgery
- Have vertigo or balance issues
Women may also wish to modify or skip the practice during heavy menstruation, depending on comfort. Always listen to your body. Mild stretching is normal, but sharp pain is a signal to stop.
Tips to Progress in Your Practice
- Learn the sequence slowly by doing it pose by pose before linking the poses into a flow.
- Use props. A folded blanket under the knees or blocks under the hands makes poses more accessible.
- Practise regularly. Even ten minutes a day builds familiarity and confidence.
- Keep a gentle focus. Following your breath or repeating a mantra can deepen concentration.
- Learn from a qualified teacher when possible. Alignment feedback in person is hard to replace.
Taking Your Practice Further
Once the Sun Salutation feels comfortable, you may want to explore structured learning. Many practitioners find that studying in the birthplace of modern yoga deepens both technique and understanding. If you’re drawn to this path, enrolling in a registered Yoga Teacher Training in Rishikesh can build strong foundations in asana, anatomy, philosophy and teaching methodology. Choosing the Best Yoga School in Rishikesh means looking at faculty experience, course structure, accreditation and student reviews rather than relying on marketing alone.
For those considering a recognised international credential, a Yoga TTC India programme can offer comprehensive training in a traditional setting. If you simply want to deepen your personal practice without becoming a teacher, a Yoga Retreat in Rishikesh offers a quiet, immersive way to practise daily Surya Namaskar, meditation and breathwork alongside the Ganges.
Frequently Asked Questions
1. Is Surya Namaskar good for beginners?
Yes. With slow movement, bent knees and modified poses, beginners can practise it safely. Learning with a teacher is helpful at first.
2. What is the best time to do Surya Namaskar?
Early morning on an empty stomach is traditional, but any time works if your stomach is relatively empty and your body is warmed up.
3. How long does one round take?
At a slow, mindful pace, one full round takes about 2 to 4 minutes.
4. Can Surya Namaskar help with weight loss?
It can contribute to calorie burning as part of an active lifestyle and balanced diet, but it isn’t a guaranteed weight-loss method on its own.
5. Can I do Surya Namaskar every day?
Most healthy adults can, starting gently and increasing gradually. Rest if you feel pain or fatigue.
6. What if I can’t do the plank or cobra yet?
Lower your knees in plank and keep your elbows bent in cobra. Strength and flexibility develop with time.
Conclusion
Surya Namaskar is a simple yet powerful sequence. In about ten minutes, it can stretch your body, steady your breath and quiet your mind. Start slowly, respect your limits, focus on breath-led movement and be patient with your progress. Over weeks and months, the Sun Salutation can become a reliable daily ritual that supports your strength, flexibility and well-being.